BlogEngine.NET 1.4 Upgrade Guide
 This was fairly popular last time around, so I wanted to write this up and make sure it was available right away with the new 1.4 release. The upgrade process is fairly easy but there are a few things to be aware of. Hopefully, I’ll cover everything you could possible want to know on your journey from BlogEngine.NET 1.3.x to BlogEngine.NET 1.4.
1. Backup your stuff
If you read this last time, you realize that there is no warranty with my guide and you are strongly encouraged to backup your blog and blog data.
At a minimum, please backup your App_Data folder, any custom themes or extensions you may have, and your web.config especially if you are a database user.
2. Download BlogEngine.NET 1.4 (website)
This is likely the step you have already done. (If not, get it here.) Once you have it located on your PC, unzip it. Right click the folder, go to Properties and remove the Read Only check. (This step has helped some and has never hurt anyone.)
3. Update your database
If you are using the the MSSQL Provider and have your blog data stored in SQL Server, we have an upgrade script for you to run. It adds a few more tables and some basic data for them. The script is found in the Setup folder of the blog and it is labeled MSSQLUpgrade1.4.0.0.sql. Run this against your BlogEngine database.
4. Configuration… as in Web.Config
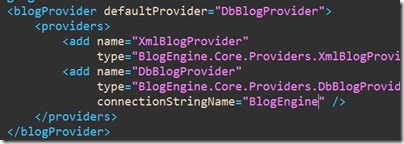
If you are a database user, you are going to have to make some updates to the web.config that you are about to upload.
First thing, you will want to add your connection string to the new web.config in the connectionStrings section.
Second, you will notice that the MSSQLBlogProvider is gone. (Its ok. It has gone to a better place.) It has been replaced with the DbBlogProvider. This is your new friend. Make sure you have your connection string name marked here and set the DbBlogProvider as your default BlogProvider. Save your changes.
5. Upload your files
This is a little bit tricker this time around so pay attention.
First, make sure you have a good backup from step #1. This is really your last chance to do that.
Now, you can upload everything except the App_Data folder. It is important to note that a few things have moved around and if you just choose to overwrite files, you’ll have some left overs. These leftovers should not cause problems for you (except noted in the troubleshooting section) but they just take up space, most notably the tiny_mce folder under the admin folder has been moved and can be deleted.
Once you have most files moved up, it is time to go into your app_data folder. In the downloaded project, you will see two new folders, datastore and profiles. Upload these to your site as well. (If you use a database for file storage, it isn’t require, but it is consistent.)
6. Security Update
If you use the default XMLMembership provider to store your passwords, this has been updated in in 1.4. We had been storing the password in clear text and this is no longer the default. If you wish to continue with clear text, you can set your XMLMembershipProvider passwordFormat to Clear in the web.config, but this is not recommended.
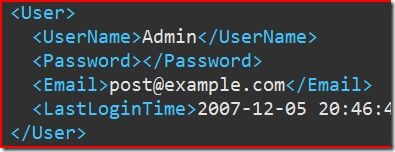
Since BlogEngine.NET 1.4 is looking for hashed passwords by default, you’ll be unable to log in unless we make a change to your user data. You’ll need to retrieve your users.xml file from your app_data folder. You should be able to see your users and passwords listed in the file. Remove the password from each entry user so it has an blank or empty password and save the file. Upload your newly edited file to your site when you are done.
This will cause BlogEngine to allow you to log in with each user using the password “admin” so that you can then change the password to whatever you’d like. The new password will be hashed.
7. Fire it up
Ok, now that we have everything out there, let’s run it. Point your browser back to your blog and after a few moment wait as your site compiles, you should see your blog back as you’d expect it. (If your blog doesn’t come up, see the troubleshooting section below.)
Now that you are up, first log in and use the change password option on your admin menu to change your password to something secure.
8. Check your settings
Everything is done, but it is always a good idea to Check your settings and make sure everything is configured properly. This would also be a great time to fill in your profile for FOAF support.
Troubleshooting
Hopefully, you are just reading this because you want to see what other poor souls are struggling with. The typical things that are going to cause trouble are custom themes and extension that were made prior to 1.4. If you have any installed remove them and try again. If you are still having trouble, try going into your settings.xml or be_Settings table and changing the default theme to be Standard.
If you are having trouble logging in to your blog, try an application restart.
If you have more tips or additions, please make them in the comments and I’ll update this post.


