BlogEngine.NET 1.4.5 Upgrade Guide
 With a new release now available, I wanted to write up another guide for those looking to upgrade their blog. The basic upgrade process is as always fairly simple, but I’m going to branch out and cover more special circumstances. The guide might seem a bit long, but you aren’t likely to be concerned with all the steps.
1. Backup
If you’ve read my guides before, you know I’m a big fan of the backup. If you back it all up and something goes horribly wrong for you, you can just pop in back in place and start again.
I should note that I when I upgraded my blog to 1.4.5, I skipped most of this step. I backed up my data and my themes and extensions. Then, I just went for it and I felt bad knowing that I was going to tell everyone to back it all up. So I’m confessing now as part of my guide that I skipped this. I do however wish that I had a full backup. (Not that I lost anything, but it would make for a great screencast to show you exactly how I upgraded my live blog.)
2. Download BlogEngine 1.4.5 (web)
If you haven’t already, now is the time to download the BlogEngine.NET software. I recommend the web version as it is all ready to go. Get it here if you don’t already have it.
Now that you have it, unzip it and remove the ready only check in the properties (apply to all subfolders and files).
3. Update your data and configuration
If you use the default XML data storage, you have nothing to do here as usual. If you are unsure, you likely fall in this category. Take a moment of silence for your database brethren and move on.
If you are using a database, then you have a little work to do. In the Setup folder, there are 4 folders, MySQL, SQLite, SQLServer, and VistaDB. If you are using on of these databases, open the folder, read the readme.txt file and follow the instructions. There is an upgrade script and a sample web.config.
The web.config has changed since 1.4 and I would recommend you use the version included in the setup folder. If you are using MySQL or SQLServer, you’ll need to move your connection string over as well.
If you were using SQLMembershipProvider and SQLRoleProvider, you’ll need to configure these in your web.config. To make things easier, we have made the dbMembershipProvider and dbRoleProvider, the default database options in our sample web.config. I personally think the SQL versions are better options, but this is the easiest option for people to get setup and since the other database configs use them, it keeps things simple.
4. Update your web server
Now, we are ready start moving files to your web server. You do have a backup you can be proud of from step #1 don’t you? If so, you can begin to copy your new files out to your web server. It is always safest to remove all the folders and files you don’t want to keep before the copy. For me, these means that I keep my app_data folder and remove everything else before I start my copy. (I put my theme and extensions back at the end from my backup.) This way you are sure you have removed all of the previous version.
Anyway, uploading your site will be the longest step of the process. Be patient.
5. Security Thoughts.
If you are upgrading from BlogEngine.NET 1.4 and have converted to hashed passwords, you can skip this section, you’ve already dealt with it. If you are using BlogEngine.NET 1.3.1 or earlier, pay attention. We’ve upgrading the XMLMembership provider security to used hashed passwords by default. This means if you are using the default security model, you’ll need to need to make some changes. If you were using the SQLMembership provider, you can skip this as well.
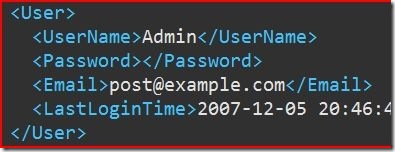
If you fall into the category of people who need to make some changes you have 2 choices. The recommended choice is to convert to hashed passwords. To do this, you simply open your users.xml file (found in your app_data folder) and remove the passwords for each users. (Don’t delete the whole password line, just the password, so that the it shows no password.) Clearing out the password will allow you to use the password “admin” when logging in. You should then use the Change Password option to change the password to a better password. The new password will be hashed.

Your other option is simply to continue to use clear text for your passwords. To do this, open your web.config and find the Membership provider section. You can change the passwordFormat from Hashed to Clear. This option is not as secure and will require you to make this change with each upgrade of BlogEngine.NET in the future.
6. Themes and extensions
If you are using a custom theme by default, you will need to put this back in place before you try to browse out to your site. If you are using special widgets or controls in that theme that depend on widgets, they will need to be back in place too. The downside of putting them all in place before trying out the upgrade is they potentially could cause you issues.
Make a note of what files you are putting out on the web server in case you have issues. If issues arise, you can simply remove these files and manually change your theme to “Standard” to test the BlogEngine setup.
7. Open your site in the browser
It will take a few moments for your site to come up the first time around. If everything went well, you should see your blog as you remember it. If you have an error or display issue, see the troubleshooting section below.
If you just did the security upgrade in step #5, log in right away and get those passwords changed from “admin” to something else.
8. Clean up
If you didn’t copy all your extensions out in step #6, now is the time to do so. Copy them out, and refresh your browser. It will recompile so don’t be shocked by the delay.
Now is a good time to check over your settings and make sure everything is coming up as you expect.
Congratulations. You are upgraded.
Troubleshooting
Don’t panic.
There are plenty of things that could be causing you minor issues that can quickly be corrected. Here is a bullet list of things of things to check first.
Compile errors
- If you are using a custom theme, widgets, or extensions, remove them, set your default theme to Standard, and try again. You can change the theme in your settings.xml file or be_Settings table depending on your setup, xml or database.
- If you are using MySQL, be sure to add the system.data section to your web.config. (You can get this from your original web.config or from this post on the forums.)
- Did you really clean out all the files (except app_data) or did you just overwrite them? Did something get left over that is causing a problem? Or did your FTP program miss some files?
- Did you customize your web.config? Try the one included in the download. Using your old web.config will get you a nasty looking error.
- If you are using MySQL or SQL Server, please check your connection string.
Security errors
- Can’t login? Try clearing out your password as described in step #5. If that doesn’t help, try using the downloaded users.xml file and logging in as admin.
- An application restart might help out if you are really locked up.
- If you are using a database and the default dbMembershipProvider, you can clear your password in the be_Users table and try logging in as admin.
- Were you using the SQLMembershipProvider and did you configure it properly? It is not a default setup.
Display errors
- It has been reported that there have been some minor styling changes from 1.3.1 to 1.4.x. Custom themes may require some minor css updates to get them working. (I’m not sure what tags have changed as I didn’t have any issues with my custom theme in 1.4 or 1.4.5.)
- If you have an empty widget bar, you will need to re-add you widgets.
- If you just added the Administration widget and it shows up blank, refresh your browser and the options should show up.
Beyond these basics, I’d strongly recommend looking on the BlogEngine.NET forums and asking a question if you don’t see your answer after searching. Please provide as much detail as possible in your forum post. The forums are the best way to get help if you are having trouble.
