Exploring Spark View Engine for ASP.NET MVC – Part 1
If you are working with ASP.NET MVC and you haven’t taken a look at the Spark View Engine, you owe it to yourself to spend a few minutes exploring Spark. While it might not be for everyone, Spark View Engine offers a different option to the standard Web Forms View Engine used in MVC and it has a lot going for it.
Over the next week, my plan is to write a few posts exploring the basics of Spark. We’ll go into installation, configuration, syntax, layouts, and partial files. There would be a lot more to dig into but this is the stuff you’ll want to start with. In this post, we’ll focus on getting your project ready to use Spark and some basic configuration.
.jpg)
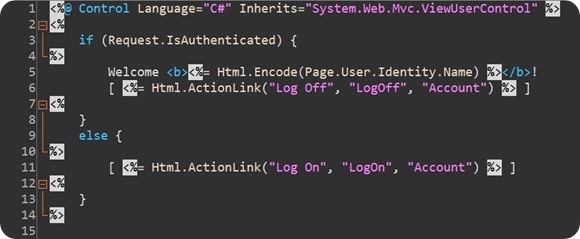
The first thing you notice about Spark is the integration of your html and code in a simply easy to read way without all the code blocks in the code. It is a cleaner look to be sure, but the features go far beyond the initial cleaner look. To give you a better idea of what Spark actually looks like, here is the LogOnUserControl that is part of the default MVC application. This is using the default view engine, Web Forms.
Now, here is the LogOnUserControl converted to Spark.
As you can see, it is a cleaner look with the alligator brackets <% %> removed. Also, there is no control header required. Using some simple convention, we are able to encode data and display html and we have conditional elements in use.
The easiest way to get a project started using spark is the following 3 steps. These instructions make the assumption that you have installed ASP.NET MVC and Spark View Engine.
- Create a new ASP.NET MVC Application in Visual Studio.
- Add a Reference to Spark.dll and Spark.Web.Mvc.dll (both found in the bin folder of your Spark install.)
- In your Global.asax, add the Spark View Engine to your View Engine collection by to the Application_Start. The code below also has a using Spark.Web.Mvc statement at the top of the file.
1: protected void Application_Start()
2: {3: ViewEngines.Engines.Add(new SparkViewFactory());
4: RegisterRoutes(RouteTable.Routes); 5: }That is it. You are ready to get started with Spark. I recommend adding some default configuration to your web.config, but it is not required. Integrating the code below in to the configuration section of your web.config will turn on debugging information for Spark syntax issues and default to automatically encode your data on your forms.
1: <configSections>2: <section name="spark" type="Spark.Configuration.SparkSectionHandler, Spark"/>
3: </configSections> 4: <spark>5: <compilation debug="true" />
6: <pages automaticEncoding="true" />
7: </spark>Now that you have the quick and easy setup stuff done, you can go ahead and run your app and you’ll notice… nothing. If you’ve done everything correctly, it still works fine. When you set up your app to use Spark, it will still render Web Forms views (aspx & ascx) if they are available. This is important as you can add Spark to an existing application and create new views in Spark while not causing problems with your functionality. As you might expect, your controllers will look for a Web Form view in the View folder with the name of the controller and then is the Shared folder. If it doesn’t find a match, it will look for the spark versions in the same 2 places.
In addition to allowing you to use either type of view, Spark views will handle the Web Form syntax well, which makes converting views from Web Forms to Spark an easy process that doesn’t need to happen all at once. (We’ll look at this further in a future post.)
I’ve gone ahead and created an ASP.NET MVC application, followed the steps above and then converted all the views to spark views. Download it and take a look around. We’ll look into the syntax and some of the conventions in the next post using this project.


